Almost every Windows 10 version users face the issue of “high disk usage or 100% CPU usage” constantly. And, they might be unaware of the fact that the main cause behind this problem is “Wsappx process.”
Wsappx process is simply a part of the ‘Task Manager’ that runs in the background being a part of ‘Microsoft’s new update for Windows 10 and Windows 8 as well. This process duty is to update and install and at the same time uninstall the applications along with user commands. However, when handling the works, it could occupy the whole disk space of Windows 10. This way it lowers down the overall system performance of one’s Windows 10 operating system.
What is WSAPPX?
WSAPPX is a process that manages the new universal and Microsoft Store applications (formerly Windows Store) in Windows 8 and 10. Since these modern / universal applications were not available under Windows 7 and earlier versions, this process is not shown in the Windows 7 versions.
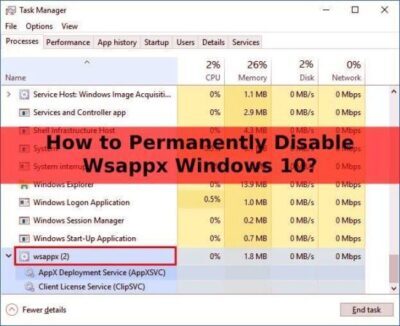
You can find by opening Task Manager (press Ctrl + Shift + Esc). Select the Processes tab and scroll down.
The process contains two sub-processes that you can view by expanding it in Task Manager. Windows 8 has a subprocess called WSService or Windows Store Service. In Windows 10 you will find an essentially identical process to ClipSVC, short for Customer License Service.
Both Windows 10 and Windows 8 also include AppXSVC, the AppX provisioning service.
What do these WSAPPX processes do?
Everything seems complicated, but not really. According to “Services” records, ClipSVC and WSService offer “infrastructure support for the Microsoft Store”. If you deactivate them, the applications in the store will not work because these processes manage the licenses. They are designed to protect against piracy for applications in the Windows Store (if there is one).
The other process, AppXSVC, is used to implement applications. This means that it runs every time you install, remove, or update an app from the store. The name comes from the file extension for in-store apps, AppX. Instead, traditional desktop software is usually run from an executable that ends with an EXE.
As with Android apps (with APK file extension), you can download AppX files from anywhere and upload them to your computer. However, this can open you to malware if you’re not careful.
Since all of these subprocesses are executed in the main WSAPPX process, you will see how their usage increases when one of them is active.
Why does WSAPPX use so many resources?
In most cases, WSAPPX is only displayed actively when you use the Microsoft Store. The process begins by simply opening and navigating. Of course, when you download an application or install an update, more resources are used because they are required for the installation process.
When you install traditional desktop software, its installation processes take resources. Instead of going through the WSAPPX process, the entry of the new program is displayed that hits the processor and the hard disk.
If you have never used Microsoft Store or Modern apps, WSAPPX will still be displayed actively, which is almost certainly due to the apps update in the background. Fortunately, you can prevent this.
Why does Xappx use so much hard drive or space?
To find the right solution to fix the problem with using your high disk or wxappx processor, you should first understand why wxappx takes up so much space. Here are the reasons:
- Wsappx activates and uses resources for processor, hard drive, etc. when using the Microsoft Store.
- Wsappx users get more resources when they download an application or install an update when the installation process requires it.
- When you install traditional desktop software, the installation process consumes resources, high processing, and disk usage.
- Applications that are updated in the background also cause problems with using the high processor wsappx processor or hard drive.
As far as we know that, this is a common problem in Windows. We have some effective solutions to help you get out of this situation.
Let’s understand the cause behind High Disk Usage of Wsappx
As we have already discussed Wsappx keeps running the background of the Windows operating system and is found in the Task Manager. But the apps keep evolving through updates and hence various programs like Paint, WordPad, and Windows media player continuously get updates that become available to download whenever Microsoft releases them. And, when the device’s OS comes across any such update it automatically catches it and begins the installation of updates, and Wsappx starts working to get the updates right. So, whenever you get an update, your device starts consuming huge data and the battery. In the process of automatic installation of apps, the usage of disk certainly increases.
How do I get rid of Wsappx?
What was the solution to Wsappx high disk issue on Windows 10
Therefore, to fix the Wsappx high CPU usage, one has to disable the Wsappx process from Windows 10. Not only that, but, this process has further two subprograms “AppX deployment service (AppXSvc) and Client Licence Service (ClipSVC)” that are also needed to be disabled along with the main culprit i.e., ‘Wsappx process’ who eats all the disk space of the computer.
So, in order to disable the Wsappx process on Windows 10 to fix the Wsappx high disk issue on Windows 10, you have to follow the steps from the below mentioned two best of the best methods. So, let’s start to get rid of Wsappx process:
1. For disabling Wsappx process first disable Microsoft Store on Windows 10:
- Open your computer and click on the ‘Start Menu’ and simply type ‘Regedit’ in order to choose ‘Registry Editor’ from all the available results.
- Then, under Registry Editor you have to navigate ‘HKEY_LOCAL_MACHINE\SOFTWARE\Policies\Microsoft’
- After that, look on the left side of the window to find the ‘Windows Store’ folder.
- Once you find it, simply click on it in order to open Windows Store.
- Then under it, click right on the screen, and from the pop-up options click on ‘New.’
- After that choose ‘DWORD (32-bit) Value’ and just rename this new file as ‘RemoveWindowsStore.’
- Then hit on ‘Enter’ and after that click right on the file in order to choose ‘Modify’ to set the value as ‘1.’
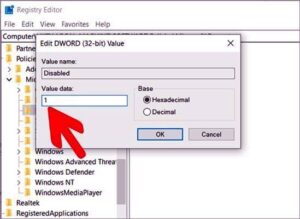
- Lastly, select ‘OK’ to apply the changes.
- That’s it! Just check whether Wsappx 100% disk usage issue still persists or not after rebooting.
2. For disabling Wsappx process disable permanently Clipsvc and AppXSvc:
- To do so, you have to open the ‘Registry Editor’ and for that open ‘Start Menu’ and type ‘Regedit.’
- Then you have to open ‘AppXSvc and Clipsvc’ by navigating to ‘HKEY_LOCAL_MACHINE\SYSTEM\ControlSet001\Services\AppXSvc’.
- After that, under it look at the right panel, click right on ‘Start’ and simply choose ‘Modify’ in order to modify the value from ‘3 to 4’.
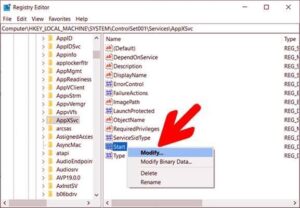
- Then, at last, save changes and restart your system to finally see the applied changes.
This way, you’ll get rid of the Wsappx process that frustrates you by eating all your system’s disk space by following, these two methods. You can further get assistance in this matter from a technical website called ‘WayBinary.’