
How To Recover Data From Mac: Losing data unexpectedly always hurts. Almost the every one of us has been through this process, where we accidentally delete some of the files and keep wondering how to get them back. It’s not that easy to get back all your files as you deleted them. Well, you don’t need to worry much! There’s always a way out.
Whether it’s a document, an image, or a video, and you want them back, we bring you the simple ways to get them easily. There are many ways to bring those deleted files or data back to Mac and extend life of mac. You must be wondering how? Right? Well, whenever you delete something, it’s not like they are deleted completely. Your files are still present on your drive.
So, let’s look at the ways of recovering the deleted files from a mac without using any software.
- Recover Data From Mac Using Time Machine Backup.
- Recover Deleted Files on Mac Using Trash Bin.
- How To Recover Files On Mac Using All Other Trash Bins.
- Recover Deleted Files On Mac Using iCloud.
Recover Data From Mac Using Time Machine Backup
It’s always advised to make sure you have a scheduled data backup on your system as it saves you from losing data due to an accident or system crash. Time machine backup is one of the great tools for recovery when using a Mac. Whether you accidentally deleted your file, or the hard disk of your Mac crashes or gets damaged or replaced, you can still get files back.
Time Machine is a built-in feature that backs up all your data or files on your Mac automatically. The data is stored on an external drive on your Mac. It keeps updating the backups every hour, every day, and every week. It also manages your storage by replacing older backups with new backups every hour.
How to use Time Machine backup?
For using the time machine, you need an external drive for backup. It will not work with external storage. Once you connect your Mac with an external drive, you will get a pop-up window on your Mac asking you to grant permission for using Time Machine.
- Select Use as a Backup Disk and continue until the last step.
- Move to the top left corner of your Mac Screen and tap the Apple icon once you finish the last step.
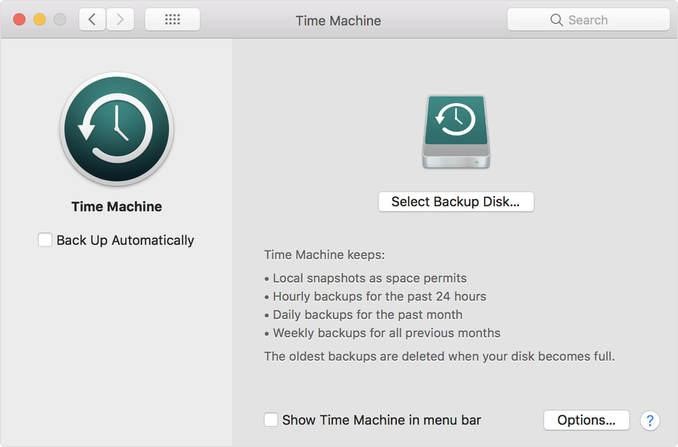
- Go to System Preferences, and you will find the Time Machine icon. Tap the icon, and you will be directed to the backup preferences of the Time Machine.
- Now, you will find ‘Select Backup Disk‘ on your screen. Click it.
- You will be asked about the selection of drive after selecting the backup disk. Select the desirable drive.
- Now, you are almost done. Just select the Time Machine backup automatically, and you are done.
All your files will be automatically backed up. And even if you ever deleted your files, all your data will be saved in the drive.
Recover Deleted Files on Mac Using Trash Bin
Whenever you delete files, your data is sent to the trash bin. Your trash bin cannot be automatically deleted until you do it manually. So, this means you can always look into your trash can if you want any files back. You can find the Trash bin at the bottom of the dock of your Mac. Right-click on the icon and open the Trash bin. You will see all the deleted files present there.
How To Recover Files On Mac Using All Other Trash Bins
If you have not saved your file in the internal drive, then you must have saved it on an external drive. Every external drive has its own trash bins. Hence, you can check the respective trash bins of the drives and find the lost data. However, to get the trash bins of your external drive, you have to search a little more as the trash bins and hidden files on your Mac. Enable the hidden files and go to “Trashes“. You will get all the files.

How To Enable Hidden Folder In Mac?
If you’re using macOS Sierra or later, you can view hidden files in Finder by simply using the SHIFT+CMD+. hotkey (that’s the period key).
For Older MacOS Versions
You can enable hidden files in Finder by running the subsequent commands in Terminal. Press Command+Space and type “Terminal” to bring it up. At the prompt, paste these two lines in there one at a time, hitting Enter after each line:
defaults write com.apple.finder AppleShowAllFiles TRUE
killall Finder
After running these commands, you ought to be ready to see the “.Trashes” folder. You’ll even empty it from Finder to clear some space on a USB stick.
Should you want to prevent showing hidden files (they’re hidden for a reason, and there are tons of them), you’ll run equivalent commands in Terminal again, but replace “TRUE” with “FALSE” on the primary line:
defaults write com.apple.finder AppleShowAllFiles FALSE
killall Finder
Recover Deleted Files On MacUsing iCloud
You can also use iCloud to recover your lost data. You may be unaware of the fact that many of your files are housed in your iCloud. Many of your folders and files are synced to iCloud. Now, this makes many of your files and folders available on the web. Hence, using your Mac Browser, you can connect to iCloud and get your files.
Now, how to recover data through iCloud?
- Open your Mac Browser i.e. Safari.
- Go to iCloud.com.
- Enter your Apple ID and password and check-in.
- Select Settings.
- Click on Restored Files present at the bottom on the left side of the screen.
- You will find all the deleted files on your screen.
- Select the files you want to restore. You can tap “Select All” if you want to restore everything.
- Now tap on “Restore“.
- All the selected files will be restored on your Mac.
Note- However, there is a time limitation that comes with iCloud trash. The files are stored on the iCloud only for a period of 30 days. So, you only have 30 days to recover the data. After 30 days, the iCloud trash gets emptied automatically.
There are also other handfuls of options to recover your files if these methods don’t work.
Suppose you deleted a photo on your Mac. Now, you always have 30 days before your photos are gone through the trash.
For recovering the photos:-
- Go to the Photos.
- Select “Recently Added” located on the left sidebar.
- Select the photos you want to recover. You can “Select all” if you would like to revive all.
- Tap on “Recover“. You will get back the photos you want.
Note- It’s important to note that you only have 30 days to recover your files. After 30 days, the photos will get permanently deleted as it gets in iCloud.
Similarly, now you can also recover deleted word files on your Mac. There’s an Auto Recovery option that comes with Microsoft Word on Mac, and fortunately, that is automatically backed up. Many times, your system crashes, or you forget to save files. In that case, the Auto Recovery option helps you effectively to recover your files.
For recovering the deleted files:-
- Go to Finder.
- Select Go.
- Click on “Go to folder“.
- Type “~/Library/Containers/com.microsoft.Word/Data/Library/Preferences/AutoRecovery“.
- You can find the lost files.
You can also recover your music or cache files on Mac. If you have deleted any music files from your iTunes, you can dig into your trash folder and search for your files. Whenever you delete a music file from your iTunes, you will be asked whether you want to move it to trash.
If Yes, then:-
- Go to iTunes.
- Select Preferences from the menu.
- Select the Advanced tab.
- You will see the files on your screens. You can copy them to the media folder if you want.
- Select the files you want to recover.
- Drag and move the selected file to the desktop.
- Move it to iTunes.
If you selected No, still you can recover the files:-
- Go to Finder.
- Select the iTunes folder.
- Select the file.
- Move it to iTunes in the dock by dragging it to the icon.
So, these are some handful of methods that you can use to get back your data or files. If this doesn’t work then you can try other methods to recover your data. There is also software available for recovering data in case nothing works. Software such as Disk Drill, EaseUS Data Recovery Wizard, and others are some of the software you can also use to recover your data. Once your files are permanently deleted from your Mac, it’s difficult to find them in the trash folder. In that case, you can use this software to recover your lost data.
Also, to avoid such situations, you can always turn on your Time Machine Backup. It helps you a lot since you can get all your deleted files there.
Meanwhile, you can use the methods mentioned above. They are safe and work effectively. Generally, using software takes a little more time and effort while on the other hand, the methods mentioned above are also easy and time-saving. If you have any suggestions or questions, feel free to mention them in the comments section below.