When a printer begins producing faded text, missing lines, streaks, incorrect colors, or blotchy images, the cause is often not the ink cartridge itself but the printer head. Printer heads contain tiny nozzles that spray ink onto paper with precision. Over time, dried ink, dust, paper fibers, or air bubbles can partially block those nozzles, reducing print quality. Cleaning the printer heads properly can restore sharp text, accurate color, and smoother photo printing without immediately replacing cartridges or calling for service.
TLDR: Poor print quality is often caused by clogged printer head nozzles, especially if the printer has not been used regularly. Start with your printer’s built in cleaning cycle, then print a nozzle check to confirm results. If automatic cleaning does not work, use careful manual cleaning with approved materials and avoid harsh chemicals. Regular printing, proper storage, and using quality ink can help prevent future clogs.
Why Printer Heads Get Clogged
Inkjet printers rely on extremely small openings to place ink accurately on the page. These nozzles are effective when clean, but they are also vulnerable to blockage. The most common reason for clogging is dried ink, which forms when a printer sits unused for days or weeks. Even if cartridges still contain ink, the ink near the nozzle can thicken or dry enough to interrupt flow.
Other causes include low quality ink, expired cartridges, paper dust, improper cartridge installation, and air trapped inside the ink delivery system. Environmental conditions also matter. A printer kept near heat, direct sunlight, or very dry air may develop clogs more quickly. Understanding the cause helps you choose the safest and most effective cleaning method.

Signs That Printer Heads Need Cleaning
Before you begin cleaning, confirm that the printer head is likely the problem. Common symptoms include:
- Horizontal white lines or gaps through text and images
- Faded printing even when ink levels are adequate
- Missing colors, especially in photos or color charts
- Streaks or banding across printed pages
- Uneven black text with broken or patchy letters
- Color shifts, such as greenish skin tones or dull reds
These symptoms can also occur if the wrong paper type is selected, the cartridge is nearly empty, or the print settings are too low. However, if the issue appears suddenly or after a period of disuse, clogged printer heads are a strong possibility.
Start With a Nozzle Check
A nozzle check is a diagnostic printout that shows whether each ink channel is firing correctly. Most printer manufacturers include this option in the printer’s maintenance menu. On many models, you can find it under Settings, Maintenance, Tools, or Printer Properties.
The nozzle check usually prints a grid or pattern for black and color inks. If the lines are complete and even, the printer head may not need cleaning. If the pattern has gaps, broken lines, or missing color sections, proceed with cleaning.
It is best to print a nozzle check before and after cleaning. This gives you clear evidence of improvement and helps prevent unnecessary cleaning cycles, which can waste ink.
Use the Built In Printer Head Cleaning Cycle
The safest first step is the printer’s built in cleaning function. This process pushes ink through the nozzles to clear light clogs. It is designed specifically for your machine and should be used before attempting manual cleaning.
- Turn on the printer and make sure it is connected to your computer or network.
- Load plain paper into the tray.
- Open the printer software, control panel, or onboard display menu.
- Select Maintenance or Tools.
- Choose Print Head Cleaning, Head Cleaning, or a similar option.
- Allow the cycle to finish without turning off the printer.
- Print a nozzle check to evaluate the result.
If the first cleaning improves the pattern but does not fully resolve it, run a second cleaning. If there is still no improvement after two or three cycles, stop and wait at least 30 minutes before trying again. Repeated cleaning in quick succession can consume a significant amount of ink and may saturate the internal waste ink pad.
Use Deep Cleaning Only When Necessary
Many printers offer a stronger process called deep cleaning, power cleaning, or ink flushing. This can be effective for stubborn clogs, but it uses much more ink than a standard cleaning cycle. It should not be your first option.
Use deep cleaning when:
- Standard cleaning cycles slightly improve the nozzle check but do not fix it
- The printer has been unused for an extended period
- One or more colors are still missing after normal cleaning
- The manufacturer specifically recommends it for the symptoms shown
After deep cleaning, let the printer rest for a short period, then print another nozzle check. Sometimes ink needs time to settle and flow evenly again.
Manual Cleaning for Removable Printer Heads
Some printers have a removable printer head, while others integrate the head into the cartridge or permanently mount it inside the printer. Before attempting manual cleaning, consult the manual for your exact model. Removing parts incorrectly can damage fragile electrical contacts or void a warranty.
If your printer head is removable, follow these general steps carefully:
- Turn off and unplug the printer. Safety matters, especially when working near electronics and liquid.
- Open the printer cover and remove the ink cartridges. Place them upright on a protected surface.
- Release the printer head according to the manufacturer’s instructions.
- Dampen a lint free cloth or coffee filter with distilled water. Do not use tap water, which can contain minerals.
- Gently blot the nozzle area. Do not scrape, rub aggressively, or touch electrical contacts.
- If dried ink remains, place the nozzle side of the print head in a shallow dish with a small amount of warm distilled water for 5 to 10 minutes.
- Remove the printer head and blot it dry with a clean lint free cloth.
- Allow it to air dry completely before reinstalling it.
After reinstalling the printer head and cartridges, run a nozzle check. If needed, perform one standard cleaning cycle to restore normal ink flow.
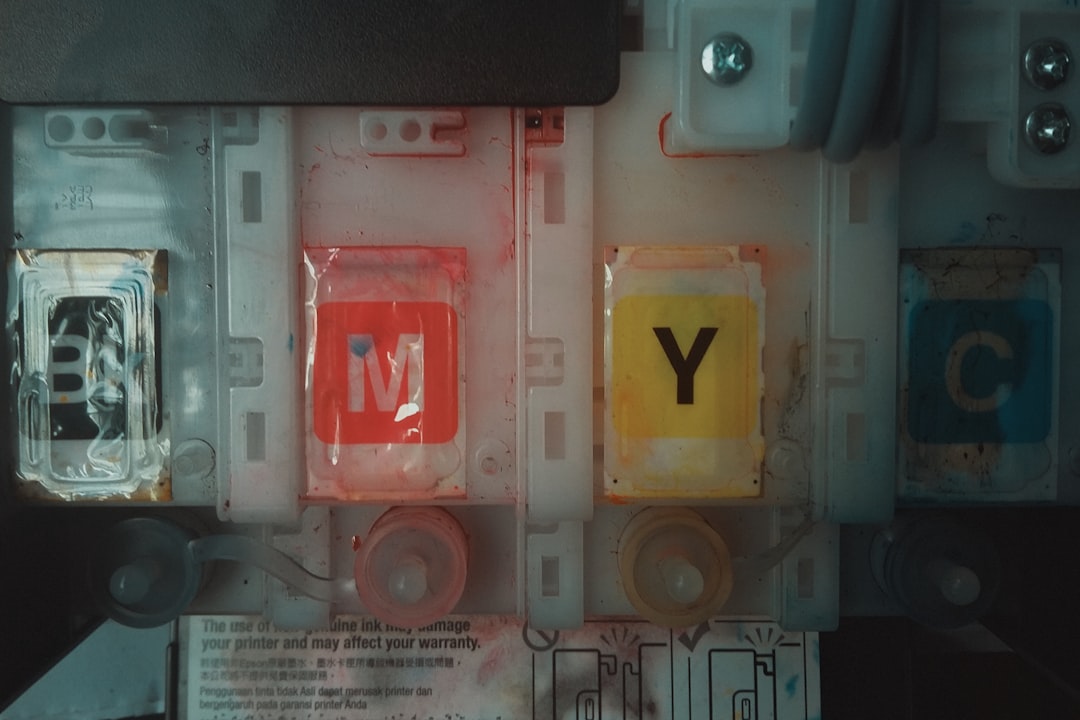
Cleaning Cartridge Based Printer Heads
In some inkjet printers, the print head is built into the cartridge. This is common in many home and small office models. If the cartridge nozzles are clogged, remove the cartridge and inspect the bottom where ink exits.
Use a lint free cloth lightly dampened with distilled water to blot the nozzle area. You may see ink transfer onto the cloth. Continue blotting gently until the transfer becomes more even. Avoid touching the copper colored contacts with your fingers, as oils from skin can interfere with communication between the cartridge and printer.
Once the cartridge is reinstalled, print a test page. If the cartridge is old, empty, or has been refilled many times, cleaning may not restore it fully. In that case, replacement may be the most reliable solution.
What Not to Use When Cleaning Printer Heads
Printer heads are delicate components. Using the wrong cleaner or too much force can turn a simple clog into permanent damage. Avoid the following:
- Household cleaners, including glass cleaner or all purpose sprays
- Alcohol or solvents unless specifically approved by the printer manufacturer
- Paper towels, which can leave fibers behind
- Sharp tools, pins, needles, or brushes that can damage nozzles
- Excessive soaking, especially near electrical contacts
- Compressed air, which may force ink or debris deeper into the mechanism
If you are unsure, use only distilled water and gentle pressure. For expensive office printers or professional photo printers, consider manufacturer approved cleaning kits or authorized service.
How to Prevent Future Clogs
Prevention is easier than repair. A printer that is used regularly is less likely to develop dried ink in the nozzles. If you print infrequently, make a habit of printing a small color page every one to two weeks. The page should include black text and all major colors so every ink channel is used.
Follow these preventive practices:
- Keep the printer powered off using its own power button, not by unplugging it abruptly.
- Store the printer in a cool, stable environment away from direct sunlight.
- Use cartridges before their expiration date.
- Choose reputable ink and avoid poorly formulated third party supplies.
- Keep paper stored clean and dry to reduce dust and debris.
- Run nozzle checks occasionally, especially before important print jobs.
Many printers cap the print head when powered down correctly. This helps prevent drying. If you unplug the printer while it is still active, the head may stop in an exposed position, making clogs more likely.

When Cleaning Does Not Fix the Problem
If repeated cleaning does not improve print quality, consider other causes. The cartridge may be empty even if the software estimate appears to show remaining ink. The ink may also be too old or thickened to flow properly. In printers with separate ink tanks, there may be air in the lines or a faulty cartridge seal.
Print quality problems can also come from misalignment, incorrect paper settings, low resolution print mode, damaged rollers, or a failing printer head. If text looks doubled or color edges appear shifted, run a print head alignment rather than another cleaning cycle. If paper has smudges or ink marks on the back, clean the rollers or platen according to the manual.
For printers still under warranty, contact the manufacturer before performing advanced manual cleaning. Document the nozzle check results and the steps you have already taken. This helps support staff determine whether the issue is a clog, cartridge failure, or hardware defect.
Final Recommendations
Cleaning printer heads is a practical way to restore better print quality, but it should be done methodically. Begin with a nozzle check, use the built in cleaning function, and evaluate results before taking stronger action. Manual cleaning should be gentle, limited, and based on the printer’s design.
Most minor clogs can be resolved with standard maintenance, especially when addressed early. Severe clogs may require deep cleaning, cartridge replacement, or professional service. By using the printer regularly, keeping it properly powered down, and choosing reliable ink, you can reduce clogs and maintain consistently sharp, clean prints.