
Anyone who has invested time into playing on an Xbox console has likely experienced a frustrating phenomenon known as controller drift. This issue occurs when your analog stick starts detecting movement even when you’re not touching it, causing unintended character movements or camera shifts in-game. It can ruin the gaming experience and make even the simplest gameplay tasks maddeningly difficult. Fortunately, there are several at-home steps you can take to try and fix controller drift before resorting to more expensive solutions like buying a new controller or sending it off for repair.
TL;DR
Controller drift is a common problem with Xbox controllers when the analog sticks register movement on their own. You can try simple fixes at home, such as cleaning the analog stick area, updating firmware, or recalibrating the controller. If none of these resolve the issue, opening the controller to replace internal components may be necessary. These steps can often restore your controller to proper functioning without professional help.
What Causes Controller Drift?
Before diving into solutions, it helps to understand what might be behind the drifting issue. Here are some typical causes:
- Dirt and debris: Dust, skin oils, and other debris can collect inside the analog stick mechanism and interfere with proper movement detection.
- Wear and tear: Over time, frequent gaming can physically wear out the internal parts of the analog sticks, particularly the potentiometers (the sensors that detect movement).
- Software bugs or outdated firmware: Sometimes, the issue may be related to system-level errors rather than actual hardware faults.
Now that we know the root causes, let’s go through the step-by-step fixes.
Step 1: Clean the Analog Stick Assembly
Dust and grime are often the culprits in minor drift issues. A deep clean can sometimes resolve these problems completely.
Items you’ll need:
- Isopropyl alcohol (at least 90%)
- Q-tips or cotton swabs
- A can of compressed air (optional but helpful)
Instructions:
- Turn off and disconnect the controller.
- Move the affected analog stick fully in all directions to identify where debris may exist.
- Dip a cotton swab in isopropyl alcohol (not dripping) and carefully insert it around the base of the analog stick, turning it as you go to loosen dirt.
- Rotate the stick while applying gentle pressure with the swab.
- Use compressed air to blow out the area, if available.
- Allow the alcohol to dry for five minutes before turning on the controller again.
If your problem was due to surface debris, there’s a good chance this simple cleaning will fix it.

Step 2: Update the Controller Firmware
Firmware updates can improve hardware performance and fix software bugs that may cause drift. Here’s how to check for firmware updates:
- Power on your Xbox console and sign in.
- Connect your controller via USB or Bluetooth.
- Press the Xbox button to open the guide, then go to Profile & System > Settings > Devices & connections > Accessories.
- Select your controller and choose … to check for updates.
- If an update is available, follow the prompts to install it.
After the firmware update, test to see if drift has reduced or disappeared.
Step 3: Recalibrate the Controller (on PC or Xbox)
Sometimes the analog stick’s calibration may be off, particularly if you’ve used the controller across various devices. Calibration resets the expected “neutral” position for the analog stick.
On Xbox:
Unfortunately, Xbox consoles do not currently support direct recalibration. However, resetting the controller’s software configuration can sometimes help:
- Go to Settings > Devices & connections > Accessories.
- Choose your controller and select Reconfigure.
- Set everything back to default and test again.
On Windows PC:
Use this method if you’re gaming with your controller on a PC:
- Open the Control Panel and select Devices and Printers.
- Right-click your controller from the list and choose Game controller settings.
- Select the controller and click Properties.
- Navigate to the Settings tab and click Calibrate.
- Follow the prompts through the calibration wizard.
This process can correct drift caused by software disalignment in the analog stick sensitivity.
Step 4: Use Dead Zone Settings (Temporary Fix)
Most modern games allow you to control sensitivity settings, including something called a “dead zone.” This is the small area around the analog’s center position where movement isn’t registered, helping mask minor drift.
How to use dead zones:
- Open the settings menu in your game, usually under “Controls” or “Input.”
- Look for an option named “Dead Zone” or “Look Stick Deadzone.”
- Increase the setting slightly until the drift stops.
Note: This is just a workaround. It doesn’t fix the problem but can improve playability while you consider long-term solutions.
Step 5: Open the Controller for Internal Repair (Advanced)
If cleaning and software fixes haven’t worked, the analog stick’s hardware may be worn out. Repair involves opening the controller and replacing the analog sensor or potentiometer. This is a more advanced solution and requires tools and care.
What you’ll need:
- T8 or T9 security Torx screwdrivers
- Soldering iron and solder (for potentiometer replacement)
- Replacement thumbstick module (available online)
Instructions (simplified overview):
- Unscrew the controller shell using the Torx screwdriver.
- Carefully detach internal cables and lift out the circuit board.
- Identify the joystick sensor module and desolder it from the board.
- Solder the replacement module in the same orientation.
- Reassemble the controller carefully and test functionality.
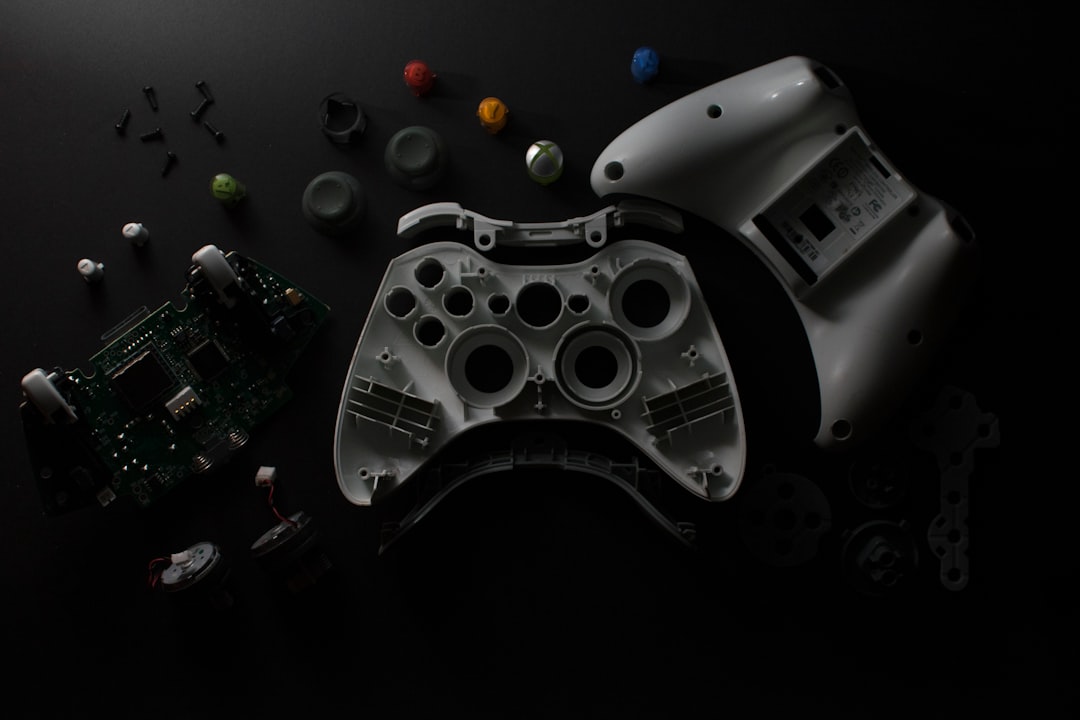
Opening your controller will void warranties, and incorrect soldering can damage the components. Proceed only if you’re confident in your skills or seek help from a repair professional.
Advanced Alternatives
If you’re not comfortable with hardware repairs or the issue persists:
- Send it in: Microsoft offers controller repairs for eligible devices through its support site. If within warranty, it may be free.
- Third-party repair services: Search for local or online businesses that specialize in controller repair.
- Replace it: Although not ideal, sometimes purchasing a new controller is more cost-effective than complex repairs.
Preventing Future Drift
Once you’ve fixed your controller, take proactive steps to avoid future issues:
- Store the controller in a dust-free, dry area.
- Clean the analog sticks regularly using alcohol wipes.
- Avoid pressing hard or tilting the sticks aggressively during gameplay.
Minor attention and maintenance can greatly extend your controller’s lifespan.
Final Thoughts
Analog drift on Xbox controllers is an increasingly common issue, but it’s not always a death sentence for your hardware. From simple cleaning and firmware updates to more involved hardware fixes, you have several options to restore performance. Just remember to use caution when working with internal components and consider professional help if you’re ever unsure. With a little effort, you can get back to gaming with a fully functional controller — minus the unintended movement.